12 minutes
Quarkus, Kotlin and PostgreSQL: A Beginner’s Journey

Cover image by Aleks Marinkovic.
- Motivation
- Getting Started
- Building out the data model
- The first endpoint
- Add CRUD endpoints
- Swagger UI
- Tests
- Exit the Cosmos
Motivation
As I’ve been working on Kubernetes deployments recently, a few common issues with Spring Boot API’s are the startup time and memory utilisation. In comparison, Quarkus provides far superior performance based on start up, response times and memory utilisation, making it a perfect candidate for Kubernetes deployments.
This post will guide you through a basic implementation of a Quarkus API using Kotlin and PostgreSQL. CRUD endpoints are included with an integration of Swagger UI for faster testing.
I’ve taken a keen interest in building API’s with Kotlin recently and this blogpost is a biproduct of learning about Quarkus API’s. I hope that by guiding you through the basics in this post, you’ll be able to share my experiences and continue to build container ready end-to-end applications!
Supersonic Subatomic Java
You may have arrived at this blogpost with a good understanding of Quarkus already, so I won’t go into too much detail of its capabilities. If you’re looking to build an API that is blazing fast and Kubernetes ready, look no further - Quarkus offers unparalleled speed when it comes to start up times, response times, low memory consumption and easy scaling.
On November 5th 2020, Quarkus 1.9.2.Final officially released. For the interests of this post, we’ll be using this version alongside GraalVM 20.2.0 (based on OpenJDK 1.8.0_262).
PostgreSQL
In September this year, PostgreSQL 13 launched, offering significant performance increases over its previous version counterpart, 12.4. Check out EnterpriseDB’s comparison for further details.
Kotlin
This post will use Kotlin 1.3.72.
Bringing it together
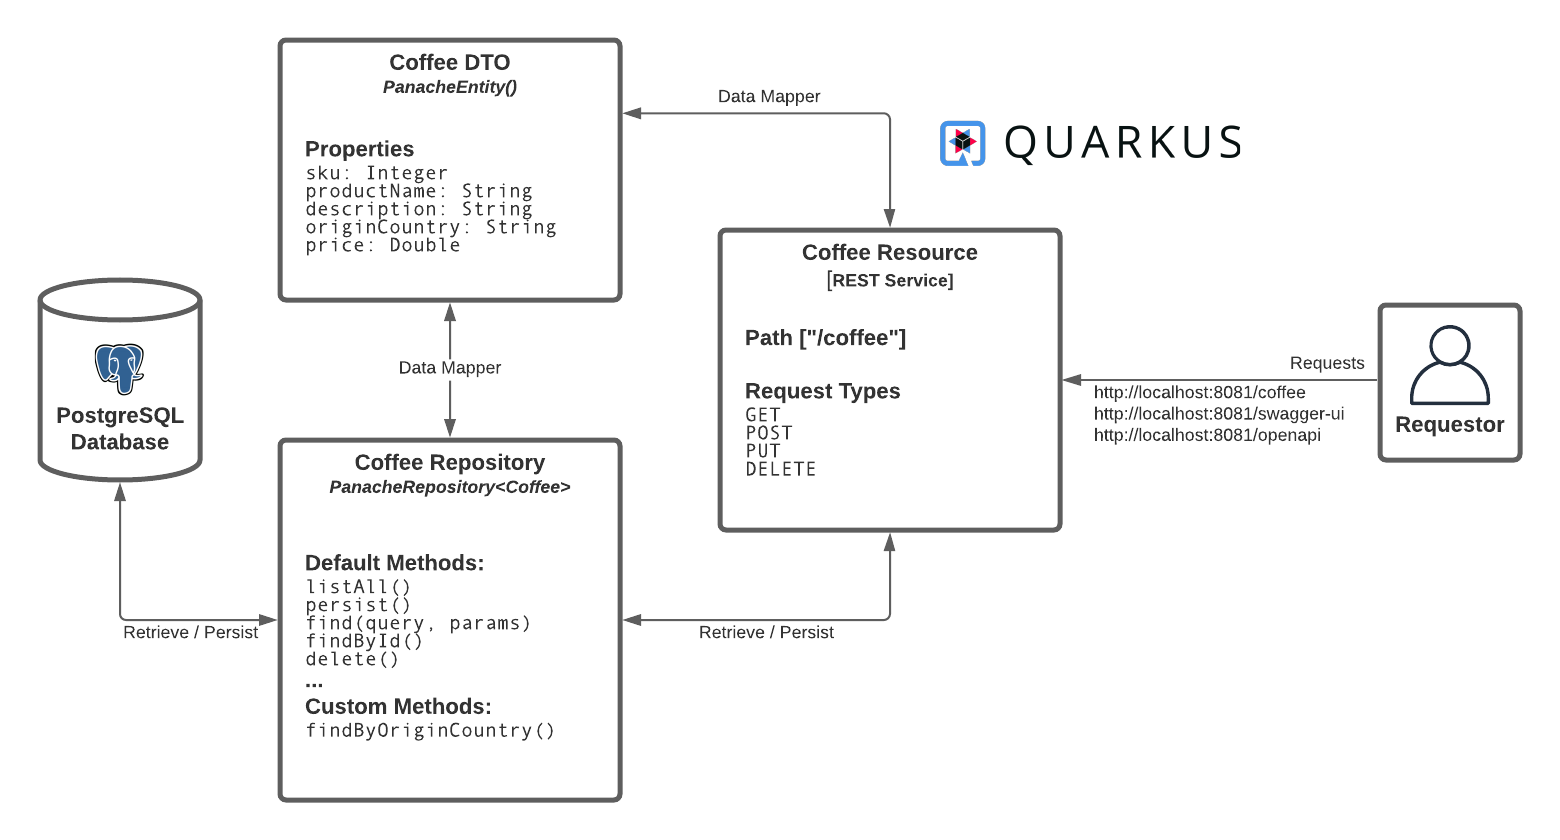
Coffee, obviously! So let’s build a very simple Coffee Supply API which will provide an endpoints to a product list of Coffee. It’s super basic - the Coffee DTO entity produces a single table in the database, a repository layer that allows us to retrieve and persist data into the table and a REST service to handle requests.
Getting Started
Github
You can find the code for this blogpost here, however I do encourage you to follow the post to further your practical understanding. Of course, feel free to fork and adapt the code base as you wish!
Spin up a PostgreSQL Database using Docker
Ensuring you have Docker installed, go ahead an start a PostgreSQL Docker container - use the following command:
docker run --name quarkus-db -p 5432:5432 -e POSTGRES_PASSWORD=password -d postgres:13.0
(Optional) Connect to your quarkus-db instance
There are many database management tools to do this - I highly recommend DBeaver.
Once installed, add a new connection for PostgreSQL, and set the following parameters:
- Host: localhost
- Port: 5432
- Database: postgresql
- Username: postgresql
- Password: password
Create a Quarkus Project
Quarkus provides an awesome bootstrapping tool to get started on a new project - code.quarkus.io - however, you’re going to use the command line instead.
Open a new terminal window, and run the following command:
mvn io.quarkus:quarkus-maven-plugin:1.9.2.Final:create -Dextensions="kotlin" -DbuildTool=gradle
You will be prompted for a few responses, enter the following:
Set the project groupId [org.acme.quarkus.sample]: com.coffeesupply
Set the project artifactId [my-quarkus-project]: coffee-supply-api
Set the project version [1.0-SNAPSHOT]: 1.0-SNAPSHOT
Do you want to create a REST resource? (y/n) [no]: y
Set the resource classname [com.coffeesupply.HelloResource]: com.coffeesupply.CoffeeResource
Set the resource path  [/coffee]: /coffee
You should then see:
[INFO]
[INFO] ========================================================================================
[INFO] Your new application has been created in /path/to/code/coffee-supply-api
[INFO] Navigate into this directory and launch your application with mvn quarkus:dev
[INFO] Your application will be accessible on http://localhost:8080
[INFO] ========================================================================================
[INFO]
[INFO] ------------------------------------------------------------------------
[INFO] BUILD SUCCESS
[INFO] ------------------------------------------------------------------------
[INFO] Total time:  15.354 s
[INFO] Finished at: 2020-11-12T15:20:50Z
[INFO] ------------------------------------------------------------------------
Go into the project directory and run gradle wrapper - this will install the necessary Gradle Wrapper for the project.
Your project structure should look like this:
➜  coffee-supply-api tree -v
.
├── README.md
├── build.gradle
├── gradle
│   └── wrapper
│       ├── gradle-wrapper.jar
│       └── gradle-wrapper.properties
├── gradle.properties
├── gradlew
├── gradlew.bat
├── settings.gradle
└── src
    ├── main
    │   ├── docker
    │   │   ├── Dockerfile.fast-jar
    │   │   ├── Dockerfile.jvm
    │   │   └── Dockerfile.native
    │   ├── kotlin
    │   │   └── com
    │   │       └── coffeesupply
    │   │           └── CoffeeResource.kt
    │   └── resources
    │       ├── META-INF
    │       │   └── resources
    │       │       └── index.html
    │       └── application.properties
    ├── native-test
    │   └── kotlin
    │       └── com
    │           └── coffeesupply
    │               └── NativeCoffeeResourceIT.kt
    └── test
        └── kotlin
            └── com
                └── coffeesupply
                    └── CoffeeResourceTest.kt
Open up your new project in IntelliJ IDEA CE.
Setup is complete! Next, you will now need to install some Quarkus extensions - but first, grab a coffee! ☕️
Building out the data model
Add Quarkus dependencies
Open up the build.gradle file in your IDE - you will see the following dependencies applied to the project:
dependencies {
    ...
    implementation 'io.quarkus:quarkus-kotlin'
    implementation enforcedPlatform("${quarkusPlatformGroupId}:${quarkusPlatformArtifactId}:${quarkusPlatformVersion}")
    implementation 'io.quarkus:quarkus-resteasy'
    implementation 'org.jetbrains.kotlin:kotlin-stdlib-jdk8'
    ...
}
You’re going to need a few more dependencies:
- RESTEasy Jackson - Jackson serialization support for RESTEasy
- Hibernate ORM with Panache and Kotlin - Define your persistent model in Hibernate ORM with Panache
- JDBC Driver - PostgreSQL - Connect to the PostgreSEL database via JDBC
To add these dependencies, run the following command in your project directory:
./gradlew addExtension --extensions="io.quarkus:quarkus-resteasy-jackson,io.quarkus:quarkus-hibernate-orm-panache-kotlin,io.quarkus:quarkus-jdbc-postgresql"
Your build.gradle file will have updated automatically, and you should see the following confirming the additional dependencies in your terminal:
> Task :addExtension
Caching disabled for task ':addExtension' because:
  Build cache is disabled
Task ':addExtension' is not up-to-date because:
  Task has not declared any outputs despite executing actions.
✅ Extension io.quarkus:quarkus-hibernate-orm-panache-kotlin has been installed
✅ Extension io.quarkus:quarkus-resteasy-jackson has been installed
✅ Extension io.quarkus:quarkus-jdbc-postgresql has been installed
:addExtension (Thread[Execution worker for ':',5,main]) completed. Took 9.105 secs.

BUILD SUCCESSFUL in 10s
1 actionable task: 1 executed
Writing the Coffee data class
The Coffee data class will contain the DTO for different types of Coffee. Create a new Kotlin class under a new package com.coffeesupply.dto called Coffee.kt, and add the following.
@Entity
data class Coffee(
    val sku: Int = 0,
    val productName: String = "",
    val description: String = "",
    val originCountry: String = "",
    val price: Double = 0.00
) : PanacheEntity()
A Coffee data class contains an SKU (stock-keeping unit, a unique indentifier or product code), product name, description, origin country and price. The PanacheEntity() extension, alongside Hibernate ORM, makes writing entities almost trivial. You can read more about it here.
Add some configuration to application.properties
Under src/main/resources, add the following to application.properties:
quarkus.http.port=8081

quarkus.datasource.db-kind=postgresql
quarkus.datasource.username=postgres
quarkus.datasource.password=password
quarkus.datasource.jdbc.url=jdbc:postgresql://localhost:5432/postgres
quarkus.hibernate-orm.database.generation=drop-and-create
Run the application
In your terminal window, run ./gradlew quarkusDev - this will start the webserver. More importantly, a table called Coffee will be created in the database - you can view this in your database management tool.
The first endpoint
You can’t really do anything with your API, creating endpoints will provide interactivity with the API - such as retrieving, persisting and updating data. Let’s explore some CRUD examples for our Coffee entity.
Creating a data load script
Create a new file under src/main/resources called coffee-load-script.sql with the following SQL script:
insert into coffee ("id", sku, productname, origincountry, price, description)
values (1, 10001, 'Kiriga AB', 'Kenya', 12, 'Blood orange, pear, biscoff');

insert into coffee ("id", sku, productname, origincountry, price, description)
values (2, 10002, 'Sumava Ruva', 'Costa Rica', 18, 'Black cherry, dark chocolate, lime');

insert into coffee ("id", sku, productname, origincountry, price, description)
values (3, 10003, 'Mama Mina', 'Nicaragua', 12.75, 'Toffee apple, orange rid, sweet tobacco');

insert into coffee ("id", sku, productname, origincountry, price, description)
values (4, 10004, 'El Limon', 'Guatemala', 13.50, 'Lemon sweets, grapefruit, demerara');

insert into coffee ("id", sku, productname, origincountry, price, description)
values (5, 10005, 'El Yalcon', 'Colombia', 9.00, 'Dark chocolate, lemon sherbert, lime');

select setval('hibernate_sequence', 5, true);
I’ve used coffee bean products from Ozone Coffee, check them out for some unbelievable coffee! 🔥 😍
You will need to add the following to your application.properties:
...
quarkus.hibernate-orm.sql-load-script = coffee-load-script.sql
Every time we restart the Quarkus server, a drop-and-create is actioned on the database and the data in the load script above will be added to the Coffee table. This is really handy for seeding sample data!
In the
coffee-load-script.sql, I set the hibernate sequence to start at 5 - the pre-loading of data will not update the hibernate sequence so it needs to be done manually to allow for continuation of the tableidsequence. Without this, you will get a duplicate key error when attempting to add newCoffeeto the table, as below:
Caused by: org.postgresql.util.PSQLException: ERROR: duplicate key value violates unique constraint "coffee_pkey" Detail: Key (id)=(1) already exists.
Create a CoffeeRepository
Create a new package com.coffeesupply.repository and add a new Kotlin file called CoffeeRepository.kt.
@ApplicationScoped
class CoffeeRepository : PanacheRepository<Coffee> {}
You can read more about why this class is annotated with
@ApplicationScopedhere.
This repository will provide you with default and custom methods that abstract the data store. This is where actions are carried out to read and write data to the database - in this example, the repository will read and write to the Coffee table in the database.
At the moment, you don’t need to define any custom methods in the constructor as we only need the methods from the PanacheRepository<Coffee> constructor. As you can see, we pass in the Coffee entity.
PanacheRepositoryprovides core methods to help you develop your API faster - you can either use IntelliJ IntelliSense to see a list of usable methods or check out the base implementation here.
Writing a GET request to find all Coffee
On bootstrapping the project, you created a resource called CoffeeResource.kt which is currently sat under src/main and looks like this:
@Path("/coffee")
class CoffeeResource {

    @GET
    @Produces(MediaType.TEXT_PLAIN)
    fun hello() = "hello"
}
Start the server (./gradlew quarkusDev) and in your terminal and run the cURL command curl http://locahost:8081/coffee; you will get a return of type TEXT_PLAN, "hello". This is a bit dull - update the GET request to the following:
| |
Hot tip: Quarkus has a hot-reload feature which means that you don’t need to manually restart the server. Simply make the change (as above), then run the cURL command again - the server will automatically reload taking into account your changes.
Run the cURL command again, and you should get the following response:
➜  ~ curl http://localhost:8081/coffee
[{"id":1,"sku":10001,"productName":"Kiriga AB","description":"Blood orange, pear, biscoff","originCountry":"Kenya","price":12.0},{"id":2,"sku":10002,"productName":"Sumava Ruva","description":"Black cherry, dark chocolate, lime","originCountry":"Costa Rica","price":18.0},{"id":3,"sku":10003,"productName":"Mama Mina","description":"Toffee apple, orange rid, sweet tobacco","originCountry":"Nicaragua","price":12.75},{"id":4,"sku":10004,"productName":"El Limon","description":"Lemon sweets, grapefruit, demerara","originCountry":"Guatemala","price":13.5},{"id":5,"sku":10005,"productName":"El Yalcon","description":"Dark chocolate, lemon sherbert, lime","originCountry":"Colombia","price":9.0}]
Awesome, so your API has returned a JSON formatted response from the server containing a list of Coffee objects. 🎉
Add CRUD endpoints
As I mentioned above, the PanacheRepository<Coffee> implementation provides us with methods to manage the Coffee repository.
POST, DELETE, PUT
Update your CoffeeResource.kt file to contain the following:
| |
A few things to note here:
@Transactionalannotation (lines 21, 32, 44) is required for any databases changes, it’s used forcreate(),delete()andupdate()methods in the resource.@Consumesand@Produces(lines 11-12) does exactly what it says on the tin - the endpoint can consume (if needed) and JSON body or produce a JSON response.The returns are wrapped with
Response.ok().build()to send headers with the response - for example in line 26, a 201 status is sent with the POST request to indicate a new resource object has been created.
A custom repository method
Add a new method to the CoffeeRepository:
| |
Add a new GET request to the CoffeeResource:
@GET
@Path("/search")
@Produces(MediaType.APPLICATION_JSON)
fun findByOriginCountry(
        @QueryParam originCountry: String
): Response = Response.ok(repository.findByOriginCountry(originCountry)).build()
Instead of a @PathParam, the endpoint above uses a @QueryParam. This means that you can send query parameters via the endpoint URL - for example:
curl http://localhost:8081/coffee/search?originCountry=Kenya
This will result in the following JSON response:
[
  {
    "id": 1,
    "sku": 10001,
    "productName": "Kiriga AB",
    "description": "Blood orange, pear, biscoff",
    "originCountry": "Kenya",
    "price": 12
  }
]
Postman
I’ve included a Postman collection - import this into your Postman Collections. Whilst your server is running using ./gradlew quarkusDev, you can test out the endpoints.
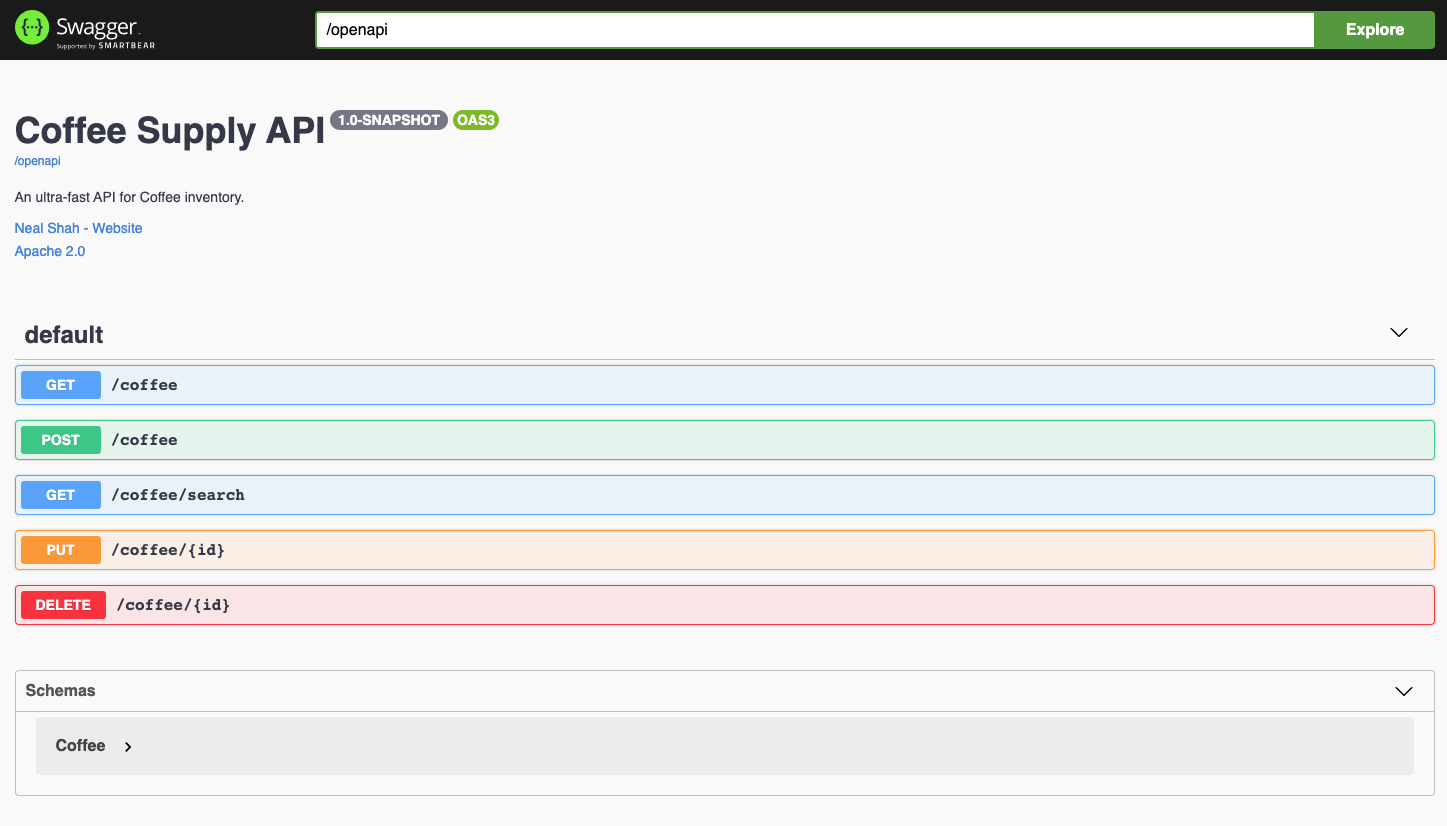
Swagger UI
Swagger UI provides you with a user interface to visualize and test your API.
Thankfully, SmallRye has produced an OpenAPI specification package that you can include in your Quarkus API project.
In your project terminal, run the following command:
./gradlew addExtension --extensions="io.quarkus:quarkus-smallrye-openapi"
You should see the following confirmation:
> Task :addExtension
Caching disabled for task ':addExtension' because:
  Build cache is disabled
Task ':addExtension' is not up-to-date because:
  Task has not declared any outputs despite executing actions.
✅ Extension io.quarkus:quarkus-smallrye-openapi has been installed
:addExtension (Thread[Execution worker for ':',5,main]) completed. Took 13.541 secs.

BUILD SUCCESSFUL in 14s
1 actionable task: 1 executed
In your application.properties file, add the following configuration:
...
quarkus.smallrye-openapi.path=/openapi
quarkus.swagger-ui.always-include=true
quarkus.swagger-ui.path=/swagger-ui
quarkus.swagger-ui.enable=true

mp.openapi.extensions.smallrye.info.title=Coffee Supply API
mp.openapi.extensions.smallrye.info.version=1.0-SNAPSHOT
mp.openapi.extensions.smallrye.info.description=An ultra-fast API for Coffee inventory.
mp.openapi.extensions.smallrye.info.contact.name=Neal Shah
mp.openapi.extensions.smallrye.info.contact.url=https://nealshah.dev
mp.openapi.extensions.smallrye.info.license.name=Apache 2.0
mp.openapi.extensions.smallrye.info.license.url=http://www.apache.org/licenses/LICENSE-2.0.html
mp.openapi.extensions.smallrye.operationIdStrategy=METHOD
Run your server with the ./gradlew quarkusDev.
You can access the Swagger UI on http://localhost:8081/swagger-ui.
Tests
I have written some basic endpoint tests which can be found in the code base. For the purpose of this post I have ignored talking about them - a topic for a future post.
Exit the Cosmos
This blogpost is a short introduction to creating a basic API using Quarkus and Kotlin, with CRUD endpoints to read/write data into a PostgreSQL database. Implementing Swagger UI gives you the ability to quickly test your API.
I will write further posts extending this Quarkus API, exploring Reactive programming, consumption of server sent events from a ReactJS frontend, as well as deployment to Kubernetes on Cloud.